top of page

AWS via Cyberduck Upload Instructions
We use AWS as our primary cloud storage. We recommend uploading via Cyberduck, a free and opensource software for uploading data to cloud storage, including AWS S3 buckets.
1) Browse to https://cyberduck.io/download/
2) Install Cyberduck for Windows or Mac

3) The .exe / .zip file will start downloading, open the file to start.
4) Click install

5) Open the Cyberduck application (might take a minute to start up)
6) Click on Bookmark => New Bookmark

7) Select Amazon S3

8) Fill in your own Access Key, Access Secret and Path (under More Options)

9) Close the pop-up => right click on the Bookmark => Connect to Server

10) You can now drag and drop files / folders and the uploads will start automatically 😊
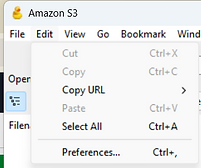
Important Settings adjustment:
To make sure large files upload without errors, we recommend to change the following setting:
Under “Edit” => “Preferences” => “Transfers” => set “Transfer Files” to “Open Single Selection”

Top Tip 1:
If you upload files with the same filename twice, the first file will be overwritten. We recommend using folders to avoid this.
Top Tip 2:
When uploading files, Cyberduck will use the full available internet bandwidth. If you experience slow browsing, you can easily (temporarily) reduce the bandwidth used for uploading.

bottom of page